
Under the Hood of your Google Analytics: Basic Alert Set Up
More and more, we are relying on technology to tell us when something isn’t working correctly in our world. Getting a beeping noise when you leave the lights on in your car or when you don’t have any paper in your printer can be helpful!
Setting up alerts in your Google Analytics is the same idea; you are configuring the tool to let you know when something isn’t working or, in the case of analytics, something is going really well.

So, what is an alert? It is configuration in Google Analytics that allows you to monitor specific metrics and send you an email or text message automatically.
As I hinted above, this can be useful, especially if you don’t log into the tool every day. In this blog post, I will run through two basic scenarios where alerts can be applied.
When my website traffic is very low (there is something wrong with my Google Analytics setup or my site isn’t working correctly).
When my website traffic suddenly goes up (I have recent content or a campaign that is attracting more traffic than usual).
These are nice and simple alerts to start with; in the future you can think about setting up alerts that are more specifically catered to your site goals and business.
First, you have to navigate to the Admin area of your Google Analytics. Under “View” go to “Custom Alerts”.

Once you get to the Alerts screen, click on the “New Alert” red button.

For the first alert let’s name it “Low site traffic”. Apply it to all your views and set it to be checked daily. You also want to apply the “Send me an email” box. If there is a problem with your site, you will want to receive an email asap.
Now comes the fun part: the Alert Conditions!
For the first alert, we will use this condition: All Traffic > Sessions with the condition being less than 1. Unless you are a very low trafficking site, this will work correctly to alert you when there is a flatline situation happening on your site (that might indicate something isn’t working correctly).
The final alert looks like this:
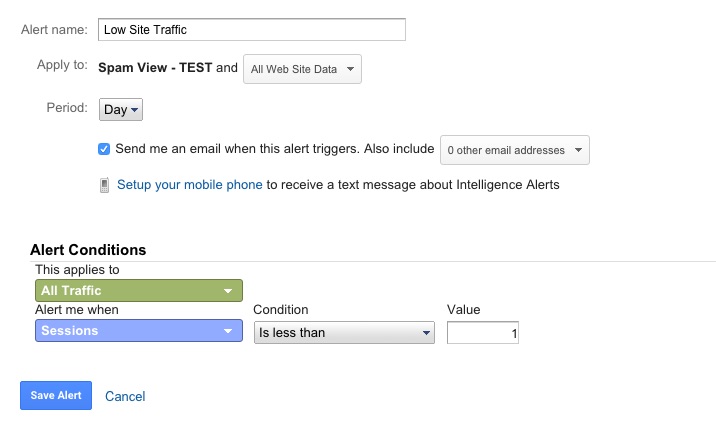
Make sure to save it and you’ve completed your first alert! Easy, right?
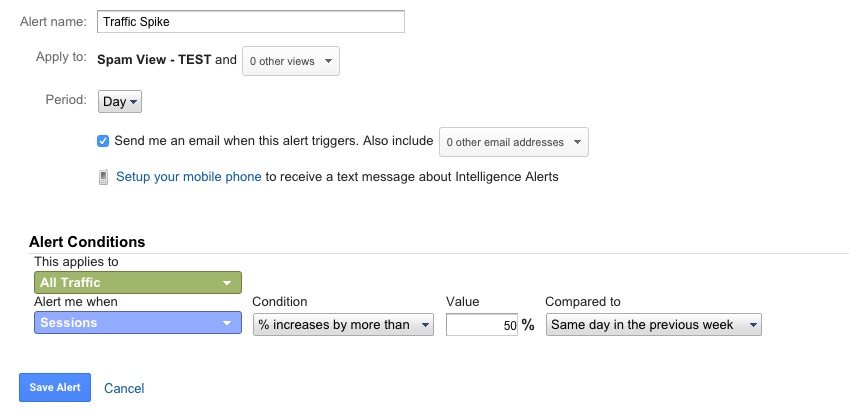
Alert number two: traffic spike! Let’s do it!
The first part of the alert configuration is pretty much the same, the only difference is if you have a Spam Filter view, you will want to apply it only to that one. Certain spam bots will create spikes in data but we are assuming in a clean data view, a spike will be because of your amazing content (and not a fake visit from a robot).
For the alert condition for a traffic spike, you will want to again select All Traffic > Sessions and for the condition choose % increase by more than 50% compared to the same day in the previous week. The final alert looks like this:
This will ensure you are really honing on any important spikes in data, that could be good or bad. Either way, you don’t need to wait until the end of the month when you happen to peak into your Google Analytics account and get a horrible surprise. Instead, you are all set up with your emails and will get notified right away.
This set up takes less than 5 minutes and can save you from a couple of headaches in the future. Also, you might start to appreciate the tool a lot more and get inspired to set up additional alerts, that are more specific to your needs.
If you are feeling inspired by my post, you can check Luna Metric’s article with many more alert ideas.
And if you want to continue learning more about Google Analytics and SEO, check out my Full Bloom SEO! I share useful information around Google Analytics and SEO, without the overwhelm or frustration.